


In the previous article of this series, we discussed Intro to auth and differentiated between authentication and authorization. If you have not read it, I will recommend you take 5 minutes to quickly do that.
AUTHENTICATION and AUTHORIZATION IN NODE.JS APIs: Intro.
By now you should understand what these two words mean and the difference between both.
According to our project flow, we should have this.
### Signup
- retrieve payloads
- payload validation
- check if the email exists in the database
- hash the password and generate a token
- save details into the database
- send email to the newly registered user
     - creation of a mailing service with nodemailer and Gmail
     - Send email to the user
Let's get to work. I always setup Eslint in my projects so I will do that now, this isn't compulsory but it is necessary. it is fine if you choose not to configure eslint it won't have an effect on the result. I wrote a short article on that.
Set Up Eslint in node-js Application .
Create a new folder name it controllers and create a user.js file in the controllers folder. I will do that programmatically using the terminal.
mkdir controllers && touch controllers/user.js
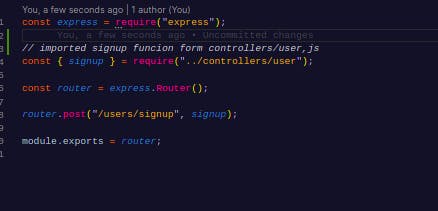
The controller will house the code implementations and logic the router /index.js folder will just hold the endpoints to make a clean code structure. In the router/index.js file, there will be a little change. Move the function to the user.js file in the controller folder then import that function into the route/index.js file. It's still the same thing I will just like to make things clearer and readable.
contollers/user.js should have this
// controller/user.js

exports.signup = (req, res) => {
  console.log("this is the signup route");
  return res.status(200).json({ message: "login successful" });
};
The diagram below is what the newly improved index.js looks like
Retrieve payload
Payloads are the data gotten from the client/user. This can be email, password, age, and some other data that are needed in this route. In our case, we only need the email, password, and role.
In node, there are different packages that help us achieve this, for this API we would make use of the body-parser package, which is part of the express framework now. Open the app.js file which was created programmatically when we generated our project folders in the previous part using express-generator, The configuration was done there.
 .
It is this line of code that enables the API to get payload from the client/user.
.
It is this line of code that enables the API to get payload from the client/user.
Let's get the payload now. We do this in the user.js because that is where we write our logic.
exports.signup = (req, res) => {
  const { email, password, role } = req.body;
  console.log(email, password, role);
  return res.status(200).json({ message: "login successful" });
};
I used js object restructuring to get the payload from the req.body.
start the server with
npm start
Open postman and hit the endpoint. fill in the payloads in the body section in postman.
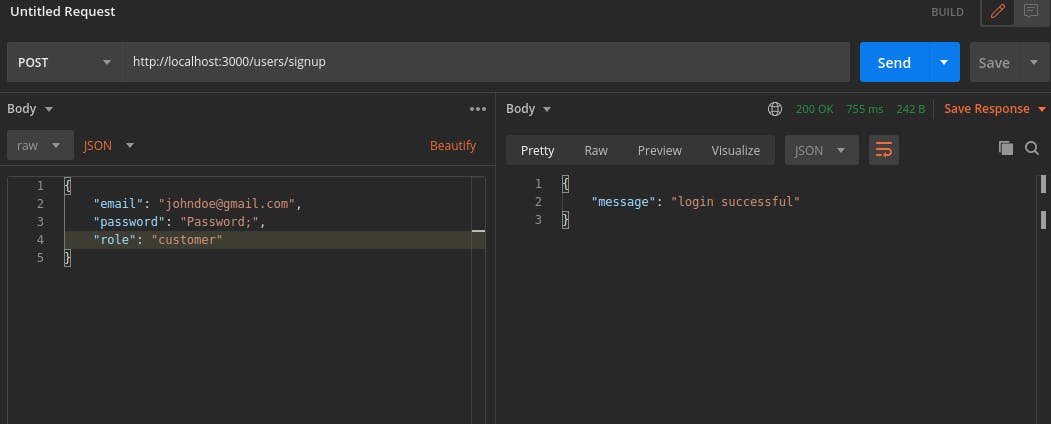 check your console you will see the payloads consoled there.
Yuppie! our API is getting the payloads now. Let
Payload validation
Payload validation is the process of checking if all the payloads are gotten from the body, if the payload follows a particular pattern e.g like the strength of the password if the email is an actual email, and so on. Validation is more than this actually, but we won't go deep in this series. I will consider writing an article that focuses on validation.
we are just gonna check if the payloads are actually present.
exports.signup = (req, res) => {
  const { email, password, role } = req.body;
  console.log(email, password, role);
  if (!email || !password || !role) {
    return res.status(400).json({ message: "One or more of the payload is missing" });
  }
  return res.status(200).json({ message: "login successful" });
};
check if email exist
This is one of the important checks during signup, we don't want one email to belong to more than one user. The email is unique to every user, it serves as the user's signature. Before we check we have to create a user model and define our user schema in the database. A schema is just a representation of how the collection will be. A collection is synonymous with a table in a relational database(E.G SQL).
Create a new folder name models and a file called users.js in the model folder.
mkdir models && touch models/user.js
We need to create a database CREATE DATABASE and CONNECT TO NODE APP
Our database is MongoDB, we need to create a database that will be connected to the API.
The database can be created locally on your PC, but MongoDB needs to be installed locally. For this series, we would be using the MongoDB Atlas, this is a MongoDB but online.
Go to https://account.mongodb.com/account/login to log in, if you don't have an account, signup, and login afterward.
- create new project
- give it a name of your choice
- Build a cluster and choose the free plan
- choose a provider of your choice
- Click the connect button to get the DB URI you should see something like this
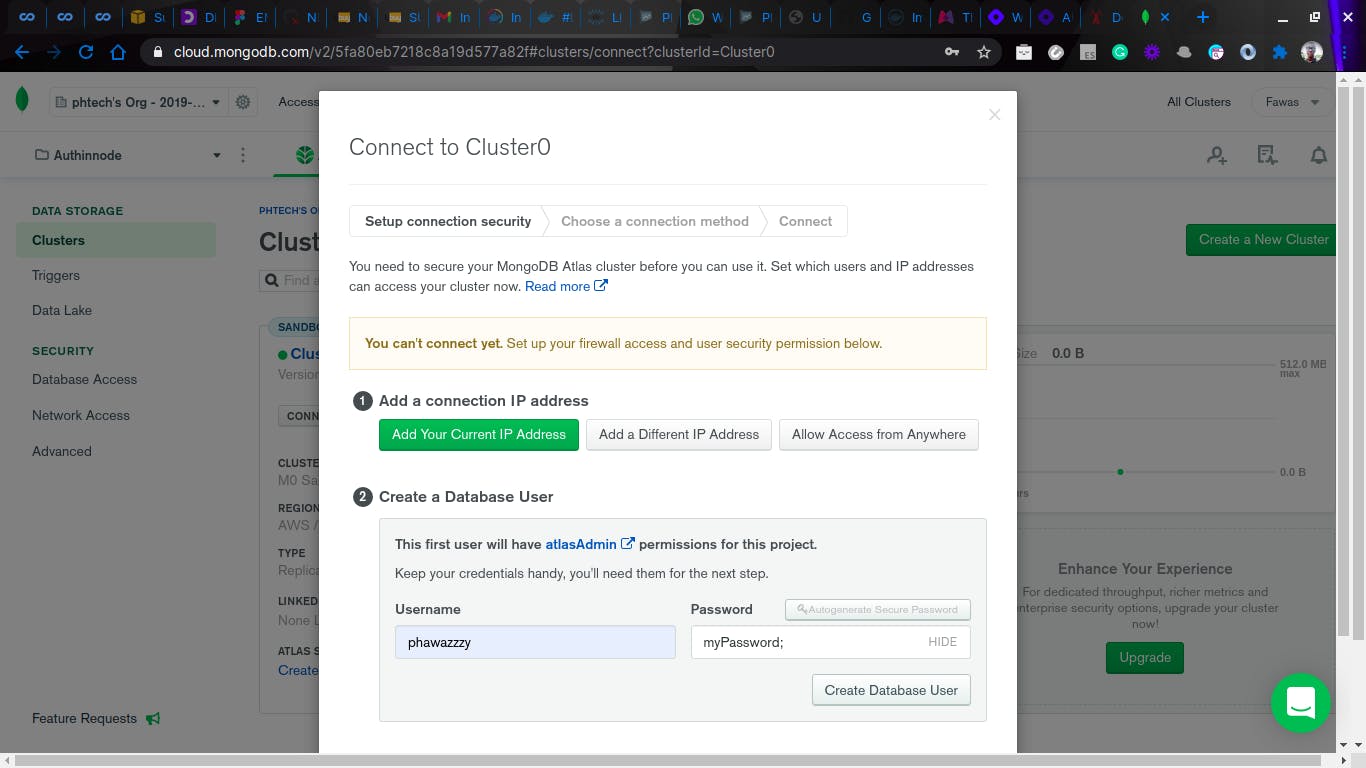 Click on Allow Access from anywhere then click allow IP address
- proceed to the database user.
- add the username and password do not disclose this user and password, I will delete this cluster after this series is done that's is why I am not bothered
- Click on create a database we just want to get the DBURI so we will be using the second option which says *connect your application just to copy the URI
- Click on the choose a connection method
copy the URI
Now head to the app.js file, create a variable called dbUri, and paste the database URI
const dbUri = "mongodb+srv://phawazzzy:<password>@cluster0.txf1t.mongodb.net/<dbname>?retryWrites=true&w=majority";
replace the < password > and < dbname > with the password you set when you were creating a database user and the dbname to a name of your choice. I have this now
const dbUri = "mongodb+srv://phawazzzy:myPassword;@cluster0.txf1t.mongodb.net/authinnode?retryWrites=true&w=majority";
- Install mongoose package. Mongoose is an ORM of mongoDB
npm install mongoose
- Connect the database to the app in app.js
Import the mongoose package
const mongoose = require("mongoose");
mongoose.connect(dbUri, {
  useNewUrlParser: true,
  useCreateIndex: true,
  useUnifiedTopology: true,
  useFindAndModify: false
// eslint-disable-next-line no-console
}).then(console.log("database connected"));
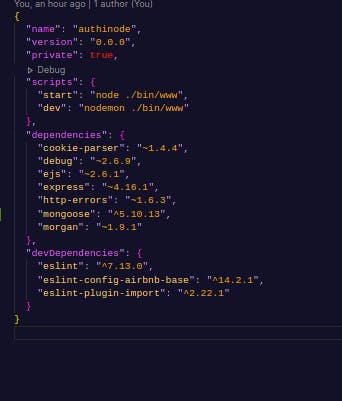
If you remember we installed nodemon in the previous article. we would make use of it now. The job of the nodemon package is to watch our js files if there are changes and it is saved, it automatically restarts our server for us instead of doing it manually. let's add nodemon script to our package.json file. Add the below to scripts
"dev": "nodemon ./bin/www"
you should have something like this
If that is done, let's run the dev script to start our server. Head to the console and type this.
npm run dev
You should have something like this, if it says Database connected, it means the DB connected to the app successfully without any issue.
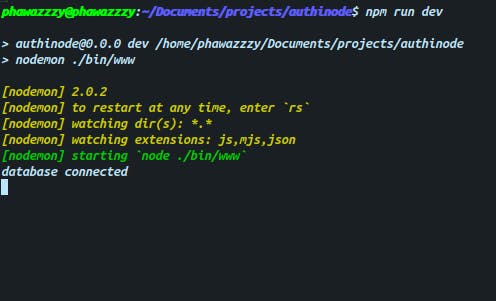
phew! now that the database is connected, we can proceed to create our user collection.
In the model/user.js file write the following.
// import the module mongoose
const mongoose = require("mongoose");

// use the Schema method in the mongoose package
const { Schema } = mongoose;

// we define the Schema
// this is how we want the user collection(table) to look like
const userSchema = Schema({
  email: { type: String, required: true, unique: true },
  password: { type: String, required: true },
  role: { type: String, required: true }
});

// export the user module so that we can use it in other files
module.exports = mongoose.model("user", userSchema);
Before all this database connection and all, we were about to check if the user with that email exists in the database if we don't have a database we can't check if a user exists in the database of course.
so we get back to user.js in the controller folder
- import the user model into the user.js so that we can make use of it.
const User = require("../models/user");
- check if the user exist
//   check if a user with this email exist
  const existingUser = await User.findOne({ email });

  //   if user exists return the message
  if (existingUser) {
    return res.status(400).json({ message: "email not available" });
  }
we should have this now
const User = require("../models/user");

exports.signup = async (req, res) => {
  // get the payload
  const { email, password, role } = req.body;

  //   check if payload is available
  if (!email || !password || role) {
    return res.status(400).json({ message: "One or more of the payload is missing" });
  }

  //   check if a user with this email exist
  const existingUser = await User.findOne({ email });

  //   if user exists return the message
  if (existingUser) {
    return res.status(400).json({ message: "email not available" });
  }
  return res.status(200).json({ message: "login successful" });
};
save the file and hit the endpoint again. it automatically creates the user collection in your database if the collection doesn't exist. Have look at the database, click on collections to confirm.
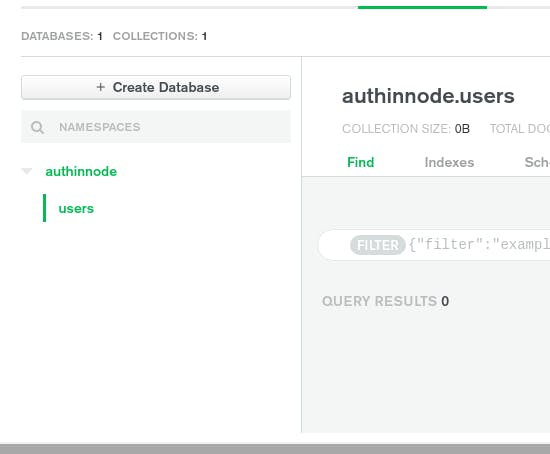 Mongoose automatically pluralizes the collection name.
Hash password
It is a best practice to hash the password of a user, for many reasons, one of the reasons is that, if your database gets hacked, the hacker won't be able to see the password since it is a hash string.
To hash a password, we make use of one of the popular hashing package, Bcyrpt.
install Bcrypt
npm install bcrypt
Create a folder and name it helpers, create a file authHelper.js in the file
mkdir helpers && touch helpers/authHelper.js
This is where we have our password logic like hashing, decrypting password, token generation e.t.c. We then export them so we can make use of them in another file.
const bcrypt = require("bcrypt");

// hashpassword using the bcrypt package
// This is a function that accept the plainpassword as an argument
const hashPassword = (plainPassword) => {
  // checks if there is password provided
  if (!plainPassword) {
// throw error is no
    throw new Error("Error hashing password");
  }

  // salt round which bcrypt will use
  const salt = bcrypt.genSaltSync(10);

  // return the generated hashed string
  return bcrypt.hashSync(plainPassword, salt);
};


// export the hashPassword function
module.exports = {
  hashPassword
};
Now head back to the user.js in the controller folder to make use of the function.
Import the module
const { hashPassword } = require("../helper/authHelper");
Make use of it in the signup module
  // hash password
  // send the password gotten from the payload as a parameter
  const hashpassword = await hashPassword(password);
You have something like this now
const { hashPassword } = require("../helper/authHelper");
const User = require("../models/user");

exports.signup = async (req, res) => {
  // get the payload
  const { email, password, role } = req.body;

  // check if payload is available
  if (!email || !password || !role) {
    return res.status(400).json({ message: "One or more of the payload is missing" });
  }

  // check if a user with this email exist
  const existingUser = await User.findOne({ email });

  // if user exists return the message
  if (existingUser) {
    return res.status(400).json({ message: "email not available" });
  }

  // hash password
  const hashpassword = await hashPassword(password);
  return res.status(200).json({ message: "login successful" });
};
generate token
Install jwt
npm install jsonwebtoken
Go back to the authHelper.js file.
Import jsonwebtoken
const jwt = require("jsonwebtoken");
write the logic create a function that accepts a payload, the payload is what will be stored in the token. We would be storing the email in the token
const tokengen = (payload) => jwt.sign(payload, "jwtsecret", { expiresIn: "6h" });
Make sure you export the function
module.exports = {
  hashPassword, tokengen
};
Back to the user.js file
save details into the database
we now save the details into the database,
//    save user details in the database
  const createUser = await User.create({
    email: email, password: hashpassword, role: role
  });
we are mapping the
- email from the payload to the email in the schema
- the hash password from bcrypt to the password in the schema
- the role from the payload to the role in the schema
hit the endpoint in postman again, to see the result. Now lets clean things up a little
- check if user has been created
``` if (createUser) { return res.status(200).json({ message: "login successful", user: createUser, token }); }
- put the whole code in a trycatch block
-  return the error gotten if there is an error during execution of the code in the try block.

The trycatch block is simply, Try all this code if you encounter any error give it to me to catch.

so you put all the code to be tried in the try block and then handle the error in the catch block.

you should have this
const { hashPassword, tokengen } = require("../helper/authHelper"); const User = require("../models/user");
exports.signup = async (req, res) => { try { // get the payload const { email, password, role } = req.body;
//   check if payload is available
if (!email || !password || !role) {
  return res.status(400).json({ message: "One or more of the payload is missing" });
}

//   check if a user with this email exist
const existingUser = await User.findOne({ email });

//   if user exists return the message
if (existingUser) {
  return res.status(400).json({ message: "email not available" });
}

// hash password
const hashpassword = await hashPassword(password);

// generate token
const token = await tokengen({ email });

//    save user details in the database
const createUser = await User.create({
  email, password: hashpassword, role
});

if (createUser) {
  return res.status(200).json({ message: "login successful", user: createUser, token });
}
} catch (error) {
return res.status(500).json({ error: error ${error} occured });
}
};
```
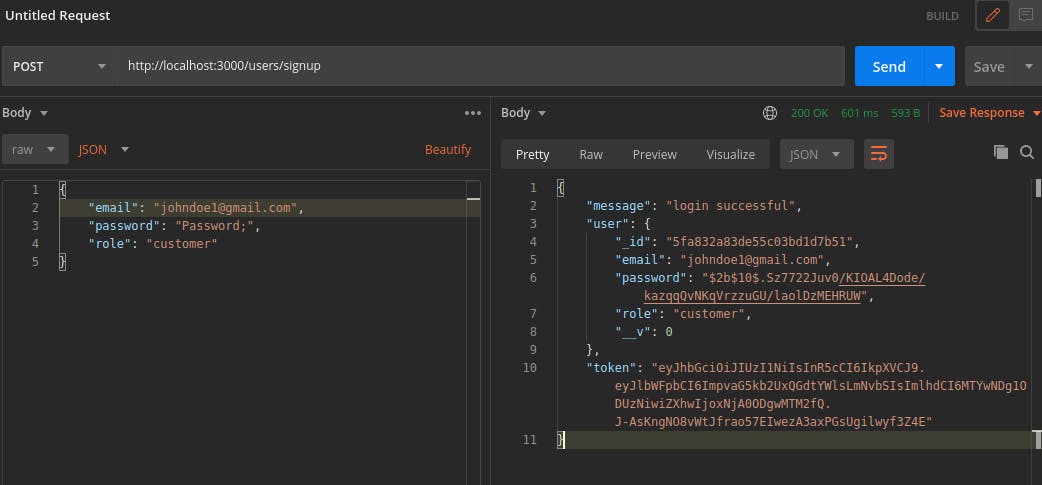
Your postman should look like this.
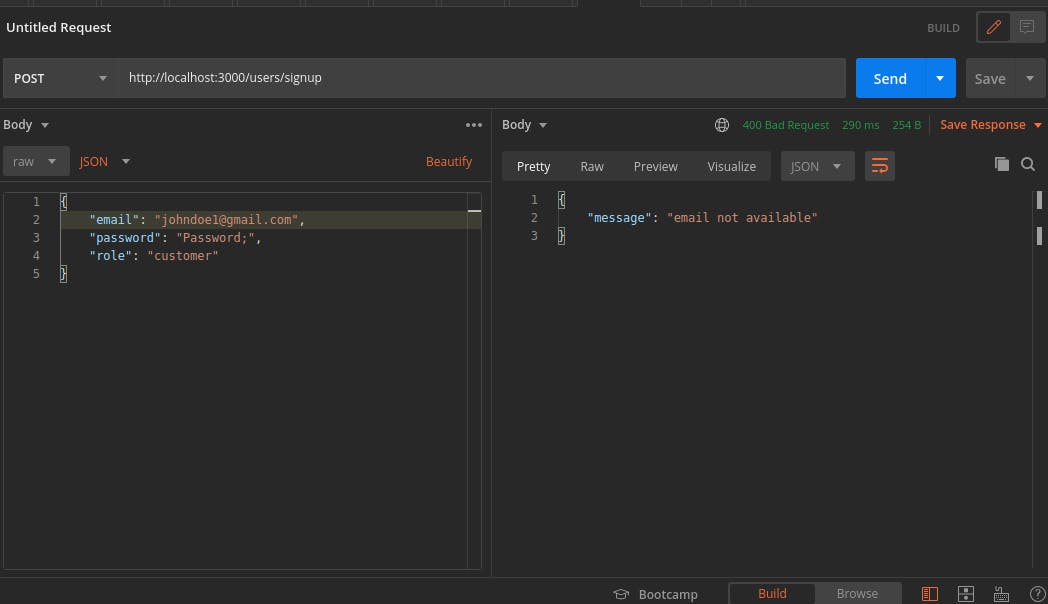
Use the same email to create an account, you should get this
Send email to the newly registered user
This would be in the next part.
I hope you enjoyed this part. If you face any error while following this tutorial, please do not hesitate to reach me on Twitter @fawas_ola my DM is opened.
Use the comment section also.
The code is available on Github. It will bein the branch Signup. Check the code on Github here